![]()
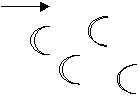
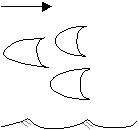
Fig. 1 Cross section through a scallop, with flow direction.
CONTENTS
of Compass Points 18
Dr. A.R. Farrant
With a little bit of knowledge, surveyors can record a great deal of useful geological information. This article describes what you need to know.
Andy Atkinson
A proposal for a project to help preserve survey data for future generations of cavers.
Andy Atkinson
Updates to the CSG constitution after the AGM.
Larry Fish
How to view paper stereo survey pairs to get 3D images.
Bob Thrun
Analysis of the Earth's magnetic field's daily variations
This issue was completed at the Autumn CSG field meet at South Wales Caving Club. We did an experiment to try and separate out the factors of people and instruments in compass calibrations, which is something I have wanted to do for years. Many Thanx to Brian Clipstone for setting out the course and to the attendees for testing themselves. The results will be presented in the next issue. We also did some DIY differential GPS testing to further Iain Miller's research in this area. This will also appear in a future issue.
AGM at BCRA conference
We held our AGM at the BCRA conference. It wasn't very exciting, but we did discuss a number of things and chart the year ahead for CSG.
Agenda:
Voting for the Committee: The
committee remains the same: Wookey (Chairman/Editor), Andrew Atkinson
(Treasurer/Secretary/Web Editor), Pete Grant (Publicity/Meets Organiser),
Olly Betts (Technical Editor).
Ratifying the Constitution: In fact it wasn't
ratified as various people pointed out problems with it as it stood. See
later for the gory details.
Data Archiving discussion: The preliminary
document was discussed and agreed with a small amendment. It is published in
this issue.
Pricing Policy: It was agreed that the CSG will
continue to disseminate cave surveying information to it's members at the
minimum possible cost, including electronic publishing on the web. We agreed
to try and keep annual membership below a fiver. Should the group decide
that it needs to raise additional funds for further projects (such as data
archiving) then the method of fund raising would need to be agreed in
advance.
UK cave co-ordinates
Allan Richardson
Does anyone already have a list of cave locations in a
computer somewhere for any of the UK caving areas? If so, Allan would like
to hear from you, as he doesn't want to have to type them all in himself.
87 Hacking Drive, Longridge, PRESTON. PR3 3EP
01772 783194
email:allanr@caving.demon.co.uk
Psion handhelds are pretty popular in this country. It would be really useful to many people, especially those on expeditions to far-flung places, if there was some survey software for this device. Does anyone know of such a thing, existing or under development? If so contact Andy Atkinson (contact details in masthead).
UIS Working Group on Survey
Symbols
This working group is a result of the
"International Meetings on Subterranean Topography" that began to verify and
standardise the existing conventional signs. This work is in full progress,
and we've been faced with many other linked problems, such as:
This will be done as a working group within the UIS
Informatics Commission and in close liaison with the International
Geographical Union and other institutions.
The aim of the working group is to establish a set of
international standards in order to make maps readable for everybody.
Chairman: Phone: 0041 31 332 01 74
Email:
praezis@mpi.unibe.ch
The UK representative on this Working Party
is Andrew Atkinson. If anyone has opinions or information on the above
topics, see that he gets to hear about it before it's too late.
Philipp Hauselmann,
Haldenstrasse 32,
3014 Bern,
Switzerland
John Hollman
Found and read your publications on the Internet. Terrific.
RE instrument lighting: I solo survey small caves and have
used this method for years: Cyalume makes or used to make a 3" long chemical
lightstick (green). My Suuntos are attached back-to-back with duct tape. They
hang with a neck loop of 1/8" parachute cord threaded though a neck pad of
1/2" tubular webbing. A keeper cord for the lightstick, a 6" long loop of
1/16" diameter bungy cord is attached to the Suuntos' attachment rings.
It's a simple matter to hold up the lightstick to the
appropriate side of the instrument with the same hand that holds the
instruments, with no magnetic anomalies.
Another lightstick is kept handy for station marking.
The little plastic extrusion at the end can often be 'jammed' into rock
ceilings. Duct-taping a ten-penny nail to the end allows it to be stood up
in dirt floors.
For a few bucks one can spend a day surveying.
I have used up a box of these sticks I bought last year
in B.C., and can no longer find a source -- anybody has one please let me
know. Bob and Bob (WV, USA) no longer carries them.
Jon M. Hollman, NSS, Manitou Springs, Colorado, USA.
Email:
jhollman@pcisys.net
Surveying and the rôle of Geological Data
Dr. A.R.Farrant, Dept of Geography,
University of Bristol
Flow indicators.
Several methods can be used to determine the
direction of water flow in abandoned 'fossil' passages. Determination of
flow direction is critically important in understanding how cave functioned,
especially in horizontal passages or phreatic passages where flow direction
may not be immediately obvious. Scallops are the most common flow indicator
and generally provide a reliable guide to flow direction. Furthermore, they
can also be used as a flow velocity indicator. Scallops are asymmetrical
solutional depressions etched into the limestone between usually between 0.5
cm - 1 m across (Fig. 1). The steep face of the scallop always lies on the
upstream side, hence by examining a large (> 20) number of scallops, flow
direction can be established. When recording flow direction, care should be
taken to note scallop directions over a relatively wide area to eliminate
the possibility of recording anomalous flow in eddies. The size of scallops
gives an indication of flow velocity; the smaller the scallop, the faster
the flow. Thus in a fast turbulent vadose stream, scallops will tend to be
elongate, unidirectional and small (0.5-5 cm). In slower flowing phreatic
passages, scallops will be much larger (10-100 cm) less asymmetric and more
irregular, often merging into wall pockets.
Geological information is rarely portrayed
on surveys. Although the role of geology in determining the plan and style of
cave formation is often acknowledged, few surveys record this crucial
information. This is primarily because most cavers are unfamiliar with basic
geological knowledge or feel that the inclusion of geological data on surveys
is irrelevant. However, much information can be usefully added onto a survey
with a little extra time and effort, and greatly enhances the use of a
survey. Several types of data can be included without more than a basic
understanding of geology or cave geomorphology. These can be divided into
three categories, flow indicators, passage morphology and geological
structures. These will be examined in turn.
![]()
Fig. 1 Cross section through a scallop, with flow direction.
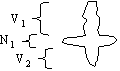
Another method of looking at flow direction is examining structures commonly preserved in undisturbed cave sediments. Alas, in many caves, mud banks and sandy floors have too often been trampled and disturbed. Adequate taping is needed at an early stage to preserve these highly delicate features. Several indicators can be used to determine flow direction such as cross-bedding, imbrication and ripple marks. These are sketched below (Fig 2).
 |
 |
 |
| A. Cross bedding. Occurs in sandy sediment. |
B. Imbrication Occurs in gravel deposits |
C. Ripple marks Occurs on sand/silt. |
Fig. 2 Flow indicators in cave sediments.
Cross bedding is best developed in fine sandy sediment and can be observed where a section has been cut into a sediment bank. However, care must be taken as the type of structure seen will depend on the orientation of the section with respect to the flow direction. The clearest cross bedding will usually be seen in a section parallel with passage orientation.
Ripple marks are common on sandy-silty floors, and like scallops, the steep lee side of the ripple is on the upstream side. Imbrication is the orientation of gravels in the direction of flow. Platy clasts such as shales and thinly bedded sandstone are easily aligned in the direction of flow. The clasts generally dip upstream. With a little practice, these observations can be made within a few minutes and easily added to the survey notes.
An example where flow indicators provided an important insight to understanding the evolution of a cave system is in Ogof Draenen. From a simple examination of the survey, it appears that Gilwern Passage is an inlet to the Beyond a Choke streamway. However, ripple marks, scalloping and cross bedding all indicate flow to the north. Similar evidence from Megadrive indicates a southward flow (Simms et al., 1995).
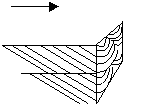
Passage morphology.
Passages can be divided into three basic
types, vadose, phreatic and paragenetic. An accurate, well drawn cross
section through a passage, with the relative vadose or phreatic portions
marked is invaluable. An example is shown below (Fig. 3).
 |
 |
 |
| Phreatic roof tube with later vadose trench |
vadose trench with solutional notch |
Paragenetic canyon. |
Fig. 3. Cross section through several passages showing each phase of development.
Vadose passages are characterised by trench shaped passages, which are often well scalloped and fretted. Phreatic passages are often more rounded in profile, have generally smoother walls. Paragenetic passages are the most difficult to recognise and are less common. In shape they often resemble vadose passages, yet have a phreatic sculpture. They are formed by sediment infilling a phreatic passage such that the floor becomes armoured with a sediment cover, and thus solution can only proceed upwards. Characteristic features of paragenetic passage include a phreatic canyon passages, parasitic half tubes etched on the passage walls and roof and evidence of a previous total sediment fill. Many of the passages in the upper series in Ogof Ffynnon Ddu show characteristic paragenetic canyons (e.g. between Selenite Tunnel and Cross Rift). The choked caves exposed in Eldon Hill Quarry, Derbyshire are another superb example, many of which are still infilled with gravel.
Geological structures.
Perhaps the simplest thing to measure while
surveying is the dip of the rock. The dip is the maximum slope of a bedding,
while the strike is an imaginary line at right angles to the dip (Fig. 4).
This can be done with a clinometer on a convenient bedding plane and takes
only a moment. Many passages are oriented either down dip or along strike.
Joints and fault lines are also important in determining potential flow
routes and can be easily marked on a survey. Joints are fractures in the
rock with little or no evidence of movement, and are often infilled with
calcite. Faults are less common, but usually more obvious, being marked by a
zone of shattered rock often several metres wide and heavily veined with
calcite. As a fault is a plane where rocks have moved in relation to each
other, individual beds are not continuous across the fault. A good example
is the Hall Fault, exposed at the base of the 40' pitch in GB Cavern. This
is marked by a thick zone of shattered heavily veined rock, dipping at an
angle of 40 ° which determines the location of the pitch.
Fig. 4 Dip and strike as measured on a bedding plane.
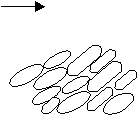
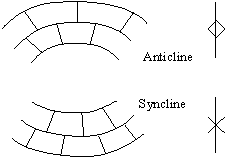
Folds can also be marked, if they are small and prominent
enough to be marked on a survey. Large scale folds can be picked out if
enough dip measurement are taken throughout the cave system. Two basic types
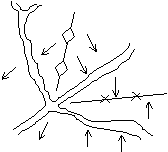
occur - anticlines and synclines (Fig 5). Many small examples can be seen in
the walls of the Swildons streamway below the old 40' pot and in G.B. On a
larger scale the position of anticlines and synclines in OFD determines the
location of many of the inlets. This is shown in the OFD Chapter in
Limestones and Cave of Wales (Smart and Christopher, 1989).
Fig. 5. Basic fold types; Plan of cave with dip
arrows, anticlines and synclines marked.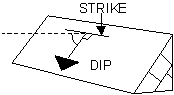
![]()
Other features
Many other observations can be easily noted
on surveys. Abrupt changes in passage shape, size or orientation usually
have a geological or geomorphological control, and if significant, should be
noted. Major changes in roof elevation at junctions are especially important
as they often provide evidence of the relative age of each passage.
Similarly, changes in rock type, the presence of shale bands or a particular
marker horizon should be noted. Which, if any of these observations will
depend on the cave being surveyed. For example, in Ogof Draenen, three rock
units can be easily distinguished, even by the non-geologist and their
location noted. The presence of non-limestone boulders in chokes is another
easily identifiable feature which can be noted on a survey.
Conclusion
Much information about caves and how they functioned can be obtained from relatively few easily observed features. However, very little of this information is ever marked on cave surveys. Furthermore, most of these observations can be recorded on a normal surveying trip without spending much time and with only a little practice. I hope that anyone involved with surveying a new cave will consider the geological aspect and plot the relevant data - it makes the geological interpretation a lot easier!
Geological data symbols
| Phreatic flow direction | Vadose flow direction |
| Dip, direction and angle | Anticlinal axis | Synclinal axis |
| Fault | Joint |
Andy Atkinson
At one of the early meetings of the CSG
concern was raised about the amount of surveying data that had been lost in
the past, and the amount of work that was being undertaken to reproduce
these surveys. The question was how to reduce the loss of this survey data
in the future.
Proposal
Most survey data is kept by the original
surveyors. This is usually the only record of the original data and the
usual way for it to get lost is for the person concerned to retire from
caving and forget about the data that is in their loft, but there is also
the potential for loss though fire etc. (e.g. UBSS hold a vast quantity of
data in the library which burned down in 1981 - on this occasion luck was on
their side and no data was lost, but this may not always be the case).
With this in mind, the best way to protect data is to set
up a second (and ideally a third) storage place. This however, immediately
comes in conflict with clubs protecting the data that they have collected,
usually to sell in order to recover the costs of the surveying, and to fund
further surveying exercises. The other problems are where and how to store
the data, the cost of the place, and the copying of the data which although
small per unit, totals to a very large quantity of data across the
country.
Protection of the data
To overcome the problem of clubs and
individuals not wanting to divulge their survey data to another outside
source, I propose that the group (i.e. CSG, BCRA or another body set up for
the purpose) that ends up holding the data, holds it under proscribed
conditions, listed below, as categories 1-5. We need to define some terms
here: The provider is the person, group or club that hands over the
data/survey and specifies the category that it is held under. They must be
entitled to do this, and thus will normally be the original
surveyors/surveying club. The author is the original
surveyor(s)/drawer(s)/club which may be different from the provider. The
holding body is the organisation charged with maintaining the archive. The
user is anyone wishing to access the archive.
Note that different types of data can be kept under
different categories. Typically the survey data itself might be category 4,
whilst the completed survey is category 2 or 3. There will also be the
facility for providers to record what information that they hold but do not
or cannot (i.e. due to expense) give to the holding body. This should reduce
duplication of work. Anyone wishing to send locations under Category 5 may
also do so with the same conditions.
As this is a system to stop the loss of data the question
must be asked what will happen to the data in Categories 3-5 when the
authors are no longer in contact.
I propose that after an agreed period (eg. 5 or 10 years)
with no contact the holding organisation tries the last known contact
address to warn them of the lapse. This information will also be published
(with the exception of category 5) in Compass Points or an equivalent
journal. If no response is heard within two years, the data will move to the
default Category, (1, 2 or 3) with the holding body becoming responsible for
giving permission for category 3 data. This will be stipulated when the data
is first transferred.
The category of the data and the default category can be
changed by the club at any time.
Data for which the original provider contributed the
entire cost of placing the data in the archive may withdraw the data. Were
the holding body has contributed to the cost the data may only be withdrawn
if this cost is reimbursed.
What Data to hold
Ideally this would be every form of data
that goes with the Cave. In reality it is proposed that the following items
be included.
It is hoped that this data will be held in computer
format with the main archive being in microfiche.
Where to Hold the Data
This would be one of the hardest problems to
solve. One of the first tasks is to find out what the potential storage
space that will be needed. If it is excepted that the paper format of the
data would not be accessible to the public, this would make the problem
simpler. The computer data could be stored anywhere with it being accessible
though the web.
There may be the possibility that Ordnance Survey or the
British Geological Survey may be willing to help out, however the freedom
for us to do as the caving world would prefer would be reduced and therefore
it may make the scheme none viable. Also organisations aims change with time
and in five years the project could just be dropped. There is always the
Lottery (Ha Ha).
Control of the Holding Organisation
Each provider donating data would be a
member so long as the data remains in possession of the Holding Body. A
committee that is elected once a year will control the day to day running.
Any proposals to change the protection of the data would be subject to a 75%
majority, and a period of at least six months after the vote for data to be
withdrawn.
Concluding Remarks
This is the initial proposal to reduce the
loss of data. Criticism and suggestions are welcomed.
Andrew Atkinson
<a@atkn.demon.co.uk>,
c/o 38 Delvin Rd.,
Westbury-on-Trym,
BRISTOL.
BS10 5EJ
CSG Constitution Update
Andrew Atkinson
2.1 The Group shall be managed by a
committee consisting of not less than two elected officers and any other
members as shall be determined by a simple majority vote of paid-up members
at a General Meeting of the Group. The committee may co-opt up to two
additional members. All committee members (including co-opted members) must
be Personal members of the BCRA.
3.1 The funds of the Group shall be placed in an
account that shall have the title BCRA Cave Surveying Group. The account
shall have no less than two signatories, including the Treasurer and
Chairman of the Group.
4.1 Election to membership shall be as determined by
the Group. Any matter of dispute shall be referred to the Council of the
BCRA.
4.2 Termination of membership of the group shall be
determined by a majority of the full committee, pending approval at a
General meeting.
6.3 Council shall retain an overall control of the
Group, and a right of access to all information held by the Group. Any
decision Council may make regarding the Group shall be final, subject to
ratification at the next General meeting of BCRA at which the Group may
appeal against the decision.
After discussions at the AGM, and further feedback at the
Autumn Field meet, these are the revised paragraphs of the CSG constitution
published in CP17. These will be ratified at a forthcoming BCRA council
meeting. If you have any objections please make them known to the committee
soon.
Viewing
Stereo Pairs
Larry Fish
Several people have asked me for information on how to
generate stereo line plots with a cave survey program. The COMPASS cave
survey software manual has a chapter on generating stereo plots. Even though
it comes from the COMPASS manual, the techniques will work with almost any
cave survey program. I thought this topic might be of general interest, so I
have included the following excerpt from the manual:
Making Stereo Pairs
Sometimes caves are so complicated that
looking at a line plot can be very confusing. Line plots are two
dimensional, but caves are three-dimensional. This means that you cannot
tell from a line plot, which passages are far away and which passages are
near. In fact, passages that appear to be close together can actually be
hundreds of feet apart.
There is a relatively simple solution to this problem
that allows you to see the whole three-dimensional structure of a cave on a
line plot. The solution is to create stereo pairs from line plots. With
stereo pairs you can view the cave in three dimensions and see exactly how
the cave is constructed.
Human beings have three-dimensional vision. This is
because their eyes are on the front of their heads and they are spaced a few
inches apart.
As a result, each eye views the world from a slightly
different angle.
The brain combines the image from each eye and forms a
single three-dimensional view of the world. This is the way the old
ViewMaster viewer works. Basically, you look at two different photographs
taken from slightly different angles. Each eye sees a picture of the object
from a different angle and your brain see a three dimensional image.
Cartographers use this technique with aerial photographs. As the plane flies
over the land, it takes a picture of the same terrain from two different
angles.
When you view these aerial photographs, the mountains and
valleys appear three-dimensional.
Creating Stereo Plots
You can do the same thing with any cave
survey program that allows you to rotate the plot. All you have to do is
create two plots that view the cave from slightly different angles. If you
view these plots through a stereoscope the cave will appear in three
dimensions. Here are step-by-step instructions for creating stereo pairs:
In other words, after you have made the first plot,
rotate the cave by about three to six degrees and plot it again. The
rotation must be in the horizontal plane. This means that the cave should
rotate in same plane that a record player turntable rotates. The bigger the
angle, the stronger the stereo effect. However, don't over do it or your
eyes won't be able to merge the images.
Once you have created the stereo pair, you will want to
view it. Some people can view stereo pairs with the naked eye, but most
people need a stereoscope for easy viewing.
Using a Stereoscope
A stereoscope is an optical instrument,
which is used to view aerial photographs. It is also very useful for viewing
stereo cave plots.
The stereoscope is similar to the View Master viewers
sold in toy stores. The instrument is very simple; it consists of two
magnifying lenses mounted in a frame so that each eye looks through one
lens.
The frame usually has four legs, so that it can be
positioned at a fixed distance above a stereo pair placed on a table.
Learning to use a stereoscope is a bit tricky, and most
people require some practice before they can use it effectively. To see the
3-D effect, you have to look at one of the pairs with your left eye and the
other pair with your right eye. The tricky part is that your eyes
automatically focus on one point, not two. As a result, you have to retrain
your eyes to see the 3-D. effect.
When you look at an object that is close to your face,
say the end of your nose, the line of sight of each eye converges at a sharp
angle on that point. If you look at a distant point, the line of sight of
each eye is nearly parallel. When you look at a stereo pair, your brain sees
it as a nearby object and focuses your eyes on a single point, when what you
really want is to have your eyes looking at is two different points, one on
each photograph. The trick then is to pretend that you are looking at a far
away object when you look at the stereo pair. This makes the line of sight
of each eye more parallel and allows each eye to focus on a different image.
The following is a step by step procedure for examining
stereo pairs.
Since each plot is a different image for each eye, the rotation must be
along the same line as your eyes. If the orientation is wrong, the stereo
effect will be completely lost.
Now look at the landmark through the stereo viewer. Close
one eye and look at the landmark through the other. It should appear
directly under that eye. If it doesn't, move the plot until it is in the
correct position. Now do the same thing with the other eye.
When everything is correctly aligned, open both eyes,
relax and pretend you are looking at a distant object. As you do this, you
should see one image drift toward the other. The further into the distance
you look, the closer the images will get. The goal is to put one image right
on top of the other. You may need to move the plot slightly, either up and
down or closer or farther apart. When everything is just right, something
magic will happen! The images will seem to lock together and the whole scene
will jump into three dimensions. After you get the scene in stereo, you can
move the plots or the viewer to other parts of the picture to examine the
cave. If part of the image is hidden under the other picture, curl the edge
of the top plot up so that you can view that part of the bottom plot. If you
lose the stereo effect, move the viewer back to the landmark and realign
everything.
At first, you may have difficulty getting and maintaining
the stereo effect, but with practice you will train your brain and eye
muscles to maintain the stereo effect easily, even when you move the
photographs around.
If you don't have a stereoscope, you may be able to get
the effect with the naked eye. Just follow the instructions above and skip
the part about the stereoscope. It easier for a nearsighted person to view
with the naked eye because they can get close to the plot and still focus on
the image. If you are nearsighted, take off your glasses before viewing the
plots. If you are not nearsighted, reading glasses or pair of magnifying
lenses can help. The main thing is that you have to get your eyes fairly
close to the page.
Hourly
Variation of Magnetic Declination
Robert Thrun
Magnetic declaration is the difference
between true north and Magnetic North. There are both long-term and
short-term changes in the Earth's magnetic field. The long-term, wide-area
changes are predicted by models such as the International Geomagnetic
Reference Field (IGRF). The values from these models are used for the values
given on the bottom of topographic maps. Surveyors should be aware that the
printed declination value may not be accurate for their time and place. A
more accurate value may be got from a surface survey using landmarks on the
topographic map.
The differences between individual magnetic compasses are
another source of error in a cave survey. Some cave survey projects
establish a compass correction by sighting between reference points, thus
accounting for both declination and compass differences. Ultimately the
limit of accuracy of a magnetic survey is established by the short-term
variations in the Earth's magnetic field. Land surveyors have long been
aware of this and use more accurate ways of measuring angles.
Measurements of the Earth's magnetic field are available
on the Internet. The British Geological Survey has the Geomagnetism
Information and Forecast Service at:
http://ub.nmh.ac.uk/gifs/on_line_gifs.html
The US Geological Survey has the National Geophysical Data Center at:
http://www.ngdc.noaa.gov/seg/potfld and
The British site will give a table of hourly means for a
single day at one of three magnetic observatories. The US ftp site has all
the data for a magnetic observatory, sometimes going back to 1901, in one
huge file with a complicated format. Data at 1-minute intervals are
available on CD-ROM in both countries. I requested 31 days of July 1997
hourly means from the UK Hartland observatory at 50° 59.7' N, 355°
31.0' E.
Data were given for hours 0 to 23. I added half an hour
to place the mean at the middle of the hour. I plotted the declination for
the entire month to see if there were noisy and quiet days. I also overlaid
all 31 days on one plot to see the reproducibility of the daily pattern. It
should be noted that the data consist of hourly means, so there is some
smoothing of instantaneous peaks.
The largest change in one day was 0.232°. The hourly
variations are small enough so they are hidden by other errors. Those who
calibrate a compass with reference points might want to do the calibrations
at the same time of day. The variations will not swamp out accuracy gains
from reading to better than half a degree, though other factors might.
Perhaps we should record the time of the compass readings on our surveys.
There are quiet and noisy locations and years. The
magnetic field varies with sunspot activity. I will leave it to others to
look at the variations at other times and places.